A Taxonomy of Agent Transactions: From Simple Calls to Multi-Agent Workflows
 J Nicolas
Four ways agents spend money, and why the distinction matters
Most developers think about agent transactions the wrong way. They imagine an agent as a smart function that calls APIs and returns results, like a fancier version of a cron job. That mental model works fine for toy demos. It breaks down the moment your agent needs to research a company, draft an email based on that research, send the email, then wait three days and follow up if nobody replied.
The problem is that "agent transaction" covers at least four distinct patterns, each with different latency profiles, payment semantics, and failure modes. Mixing them up leads to architectures that work in testing and fall apart in production. This article gives you a taxonomy you can actually use when designing agent workflows.
Pattern 1: Simple tool calls
The simplest agent transaction is a synchronous tool call: your agent sends a request, a tool executes, you get a result back within the same process. Think of it as an HTTP request with money attached.
Here's what this looks like against the OneShot SDK:
import { OneShotClient } from '@oneshot-agent/sdk';

const client = new OneShotClient({ walletKey: process.env.AGENT_WALLET_KEY });

// Agent pays ~$0.008 USDC per verification call
const result = await client.tools.verify({
  type: 'email',
  value: 'contact@example.com'
});

console.log(result.valid); // true/false, usually back in <800ms
The payment happens atomically with the call. Your agent's USDC wallet is debited when the tool executes, not when you instantiate the client. If the tool fails, you don't pay. That's the x402 protocol doing its job: the HTTP 402 response code gates execution behind a micropayment, so there's no separate billing cycle or API key quota to manage.
Simple tool calls are appropriate when the result is needed immediately to continue the workflow, the latency is under a few seconds, and the cost per call is small enough that you don't need approval logic. Email verification, phone number lookup, basic research queries all fit here.
The non-obvious gotcha: don't wrap these in retry loops without thinking about idempotency. If your agent retries a failed call and the first call actually succeeded (network timeout on the response), you've paid twice and potentially sent two emails. Check the OneShot API reference for which endpoints are idempotent before writing retry logic.
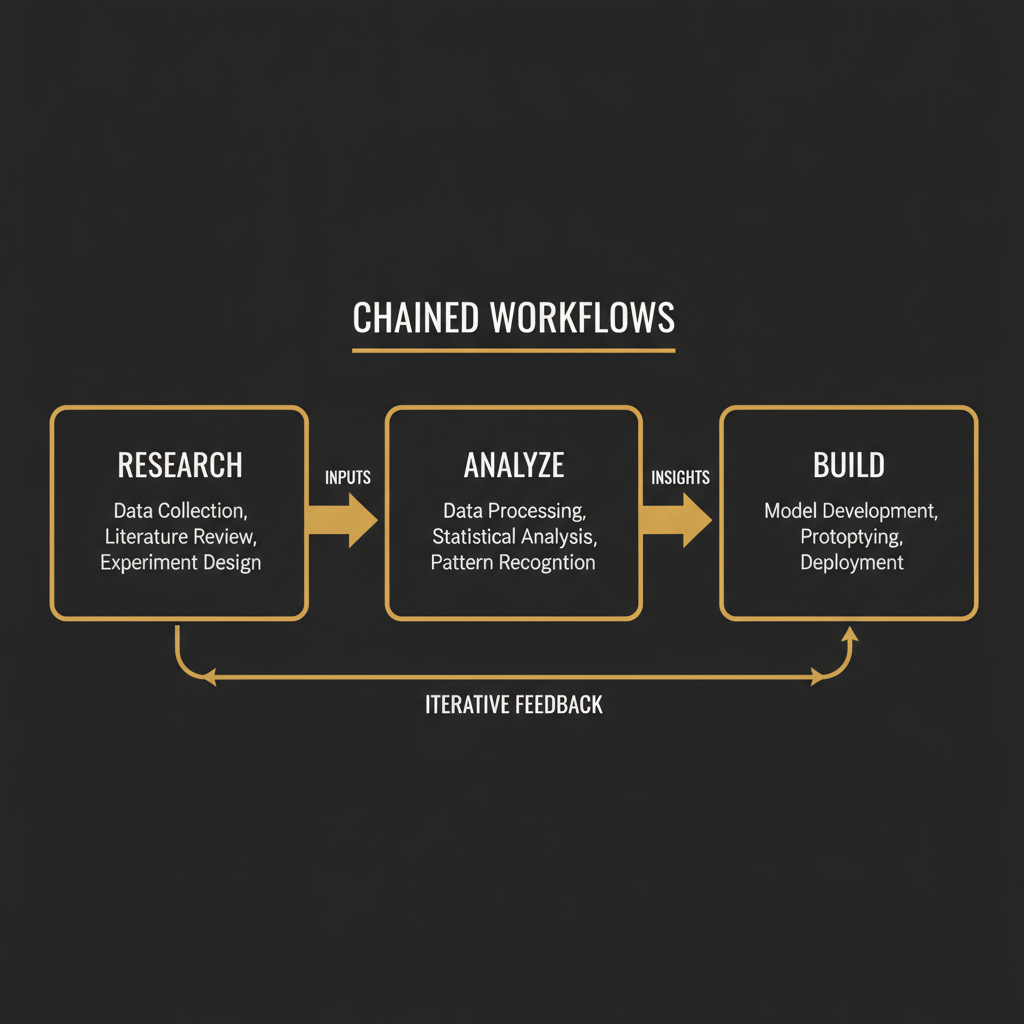
Pattern 2: Chained workflows
Chained workflows string multiple tool calls together where the output of one becomes the input of the next. The classic example in agent commerce: research a prospect, analyze what you learned, then build a personalized outreach.
async function researchAndOutreach(companyDomain: string) {
  // Step 1: research (~$0.04, takes 3-8 seconds)
  const research = await client.tools.research({
    query: `${companyDomain} recent news funding team size`,
    depth: 'standard'
  });

  // Step 2: analyze (local LLM call, no payment)
  const analysis = await myLLM.complete({
    prompt: `Based on this research, identify the top pain point: ${research.summary}`
  });

  // Step 3: build the email (~$0.02)
  const email = await client.tools.build({
    type: 'email',
    context: {
      company: companyDomain,
      pain_point: analysis.result,
      research_summary: research.summary
    }
  });

  return email;
}
Total cost for this chain: roughly $0.06 USDC per prospect. Total latency: 10-20 seconds depending on research depth. Those numbers matter because they determine your unit economics before you've sent a single message.
Chained workflows have a specific failure mode worth knowing: mid-chain failures. If step 2 (the local LLM call) fails after step 1 has already paid and executed, you've spent $0.04 on research that goes nowhere. The fix is to checkpoint state between steps. Store the research result before calling the LLM. If the chain restarts, load from the checkpoint and skip the paid steps that already completed.
This is where the distinction between stateless and stateful chains matters. A stateless chain re-runs everything on failure. A stateful chain knows where it left off. For chains where each step costs real money, stateless is expensive. Build the checkpoint logic before you need it, not after you've debugged a billing anomaly at 2am.
Pattern 3: Agent-to-agent delegation
This is where things get genuinely interesting. An orchestrator agent breaks a task into sub-tasks and delegates them to specialized agents, each of which may use its own tools, incur its own costs, and return results asynchronously.
LangChain's agent concepts documentation covers the general orchestration patterns well. The part that documentation doesn't cover is what happens when money enters the picture.
In agent-to-agent delegation, you need to decide who pays. There are two models:
Orchestrator pays: The top-level agent funds all sub-agent tool calls from its own wallet. Sub-agents are trusted executors with no financial authority. Simpler accounting, but the orchestrator needs a large enough wallet balance to cover the entire job upfront.
Sub-agent pays, gets reimbursed: Each sub-agent has its own wallet and gets paid by the orchestrator when it delivers results. This is closer to how real subcontracting works. The orchestrator pays per deliverable, not per tool call. More complex to implement, but it lets you run sub-agents as independent services that could work for multiple orchestrators.
// Orchestrator pattern: paying sub-agents per deliverable
const researchAgent = new SubAgentClient({
  endpoint: 'https://agents.example.com/researcher',
  paymentWallet: orchestratorWallet,
  maxBudget: 0.50 // USDC cap per job
});

const emailAgent = new SubAgentClient({
  endpoint: 'https://agents.example.com/emailer',
  paymentWallet: orchestratorWallet,
  maxBudget: 0.25
});

// Orchestrator delegates and pays on completion
const researchResult = await researchAgent.run({
  task: 'research prospect',
  prospect: companyDomain
});
// Wallet debited: actual cost reported by sub-agent, up to maxBudget

const emailResult = await emailAgent.run({
  task: 'draft outreach',
  research: researchResult.output
});
The maxBudget parameter is load-bearing here. Without it, a misbehaving or compromised sub-agent can drain the orchestrator's wallet. Treat budget caps as a security control, not just a cost control.
Soul.Markets is where you'd find and evaluate sub-agents for delegation. Each agent lists its capabilities and pricing in a soul.md file, which gives you a machine-readable spec before you commit any budget to it.
Pattern 4: Long-running async jobs
Some tasks can't complete in a single request. A voice call that puts your agent on hold for 45 minutes. A compliance check that takes hours. An SMS thread that needs to wait for a human reply before proceeding.
Freebot (the consumer agent that fights corporate customer service) runs almost entirely on this pattern. It calls a company, gets put on hold, waits, negotiates, and reports back hours later. The agent isn't running continuously during that wait. It's polling.
// Start a long-running voice job
const job = await client.tools.voice.start({
  number: '+18005551234',
  objective: 'Cancel account and request full refund for order #98234',
  on_success: 'resolve',
  on_failure: 'escalate'
});

console.log(job.id); // "job_7f3k2m9p"
console.log(job.status); // "queued"

// Poll until complete (or use a webhook)
async function waitForJob(jobId: string, intervalMs = 30000) {
  while (true) {
    const status = await client.jobs.get(jobId);

    if (status.state === 'complete') {
      return status.result;
    }

    if (status.state === 'failed') {
      throw new Error(status.error_message);
    }

    await new Promise(r => setTimeout(r, intervalMs));
  }
}

const result = await waitForJob(job.id);
// Payment settles only when job.state === 'complete'
// No charge if the call fails to connect or agent can't reach a resolution
The payment pattern for async jobs is different from synchronous calls. You're not paying per API request. You're paying per outcome, or per unit of time, depending on the tool. Voice jobs on OneShot charge on resolution, not on call duration. That aligns the tool's incentive with yours: it only gets paid when the job actually succeeds.
The polling interval matters more than most people realize. Polling every second for a 45-minute call wastes compute and can hit rate limits. Polling every 5 minutes means you might not notice a failure for 5 minutes. A reasonable heuristic: start at 30-second intervals, back off to 5 minutes after the first 10 minutes, then webhook if the job runs longer than an hour.
Set a maximum wait time and treat it as a hard timeout. A job that never resolves is worse than a job that fails cleanly, because it holds state and may block downstream steps indefinitely.
Choosing the right pattern
Here's a quick decision framework:
- If you need the result to continue immediately and it costs under $0.10, use a simple tool call.
- If you're combining multiple tools where each output feeds the next, use a chained workflow with checkpointing.
- If you have parallel sub-tasks that could run independently, or specialized agents that do one thing well, use delegation with budget caps.
- If the task involves waiting for humans, phone systems, or external processes, use async jobs with polling or webhooks.
Most real agent workflows combine all four. A top-level orchestrator (Pattern 3) kicks off research chains (Pattern 2) and async voice calls (Pattern 4), with individual verification steps (Pattern 1) scattered throughout. The key is being explicit about which pattern each component uses, because the error handling, payment logic, and retry semantics are different for each.
Getting started
The OneShot SDK guide covers the authentication setup and wallet configuration you'll need before any of these patterns work. Install the package with npm install @oneshot-agent/sdk, then read the pricing page to understand the cost structure for each tool before you design your workflow. Knowing that a research call costs 4x a verification call changes which calls you put inside retry loops.
If you're building something that orchestrates other agents rather than calling tools directly, the MCP setup documentation is the faster path. It handles the agent-to-agent payment protocol without you needing to implement the wallet handshake from scratch.
One thing to watch as the ecosystem matures: the async job pattern is where the most interesting economic structures will emerge. Pay-per-resolution pricing (like Freebot uses) only works because the tool can verify outcomes. As more tools add verifiable outcome signals, expect to see more agent workflows shift from paying for compute time to paying for results. That shift changes unit economics significantly, usually in the agent's favor.